31 July 2011

Birthday bliss - Part 1

I turned 30 today and I got to spend my day celebrating with wonderful friends.  Since it was a Sunday, we decided brunch would be the best way to combine two things I love - friends and food!

B and I met up with N, M, A and J at 1230 at Bazin's on Church in downtown Vienna to enjoy some tasty bites and to ring in my "left-my-20s" status.  We started our meals with a round of mimosas (and a bloody Mary for J) while we settled in to decide on food. We quickly realized that we couldn't be without Navajo Fry bread as an appetizer while we continued deciding on our mains.  The fry bread arrived just as we were placing our meal orders, hot and crispy and smelling of county fair and elephant ear, drenched in cinnamon and sugar. Amazing!

Our mains arrived and we quickly found that everyone had made good choices as everything was delicious!

B and N both ordered the daily quiche, filled with asparagus and 
spinach and served with a delicious side salad.

J enjoyed prime rib sliders with blue cheese!

M chose the salmon salad with tomatoes and garbanzo beans!!

And A and I enjoyed Huevos Rancheros with homemade corn tortillas.

Before I was even half way through my huevos rancheros, I was stuffed.  So when the waitress brought out ice cream cake the N had hauled, in the scorching heat, all the way from Arlington I thought I might explode.  But the cake was so delicious that I had to set aside being full and just enjoy.  Mmmm...I'm salivating just thinking about it. 

We took our time over our meals, enjoying each other's company and laughing.  There is always a lot of laughing. This was EXACTLY the way I wanted to spend the day.  I am so grateful for every face that shared that table!  Thank you all for helping me celebrate and for being the amazing, generous, soul soothing people that you are. 

30 July 2011

Not so Bellissimo

I decided that this year, to wave goodbye to my 20s, I wanted to be pretty low key and just enjoy the company of my closest friends.  In keeping with that theme, B and I decided to have a little celebration just the two of us on Saturday night before my actual birthday on Sunday.  We made reservations to check out a neighborhood Italian place in Fairfax called Bellissimo.  It gets rave Yelp reviews, which is something both B and I look to as a gauge for what's to come. 

We entered into a cute little store front restaurant that held no more than 20 tables.  They had a little trouble finding our reservation since we'd made it same day on Open Table and they seem to be more of a call-in, hand written reservation kind of place.  But the owner was extremely sweet, getting us seated right away and coming over to the table to chat with me while B parked the car.  So far, things were looking up for our evening of neighborhood Italian.


The service for most of the meal was excellent. In fact, there were more servers than tables I think. We were rotated between three different guys over the course of the night and with the exception of one time, never wanted for anything.

The place has a pretty good sized menu and it took us a long time to decide.  When we finally ordered, B chose the Insalata di Rucola (arugula salad) and one of the evening's specials, a roasted rockfish.  I chose the Torretta di Mozzarella (a basic caprese salad) and the Agnolotti Amore ("round ravioli" style pasta filled with goat cheese in cream sauce).  We also shared a bottle of Pinot Grigio.

Unfortunately, our disappointment started when a spinach salad with fennel and walnuts was delivered to B in lieu of the arugula salad he'd ordered.  Although credit goes to the restaurant that, aside from being a little stingy with the parmesan, the salad was delicious.  My caprese, sadly, wasn't as good.  To bottom line it, the ingredients were cheap and the tomatoes weren't ripe which made for an overly salty and sad caprese.

Our entrees were another mix of highs and lows.  My agnolotti was homemade, fluffy and delicious but bogged down in an overly heavy sauce that was clearly not the "light" cream sauce the menu claimed it to be.  B's rockfish was so-so, a little overcooked and served with sugared carrots that were well prepared but a little too sweet to be paired with the subtle fish.

The best thing I can say about the wine is that it wasn't memorable, good or bad.

After a long wait for our waiter to return we ordered a tiramisu to share to cap off our meal. No highs and lows here, just highs. It was delicious.

Overall, this was a meal that gets about a B-, better than chain Italian but nothing compared to some of the other "neighborhood Italian" choices offered in the metro DC area.

27 July 2011

Food truck fabulous

Most days my "working downtown" glass is half empty.  The traffic to get there is murder (or might force me to commit it one day), its littered with tourists who walk about 2 miles an hour while looking at me like I'm a haughty (insert expletive of choice here) for saying "Excuse me" to get by them.  And in the summer it always a few degrees hotter downtown than in our already oven-like little slice of Northern Virginia. 

But today my "working downtown" glass wasn't half empty, it wasn't even half full.  Rather, my glass runneth over as I stood on 12th Street with several coworkers trying to decide which of the three tasty food trucks would deliver unto me my lunch!!

Food trucks started hitting streets in New York in 2009, but the food truck fad has really only taken hold in DC since 2010.  But there are many of them with more launching every day.  There is even a fantastic site that you can use to keep track of which food trucks are nearby at any given time.

The Halal Grill and Halal Gyro Plus trucks, ready to serve hungry downtown employees!

The Feelin' Crabby truck

This is not my first food truck rodeo, I've had the pleasure several times working in downtown DC and my favorite so far has been the Lobster truck that serves the most AMAZING lobster and crab rolls.  In keeping with that tasty theme, I decided to try out the Feelin' Crabby truck and I'm really glad I did.  

I ordered a crab sandwich. Packed with Maryland blue crab and very little filler, just a few red peppers and a mayo-based dressing that was so light I wouldn't have realized it was mayo if not for the sign telling me so, this sandwich is excellent.  I could have gone for an untoasted and softer bun, it was a little hard.  But otherwise it was perfect! And $13 dollars for the sandwich and a homemade lemonade.  For downtown DC, that's a great deal.

24 July 2011

Dry-rubbed ribs or how to turn procrastination into something delicious

This weekend I brought home a four-inch stack of work. And because that's just how exciting my life is, working my way through the stack has eaten up my entire weekend.  I am still an inch and half and several emails from finished and it all has to be done before I go to work tomorrow, but I can't take it anymore. I have to divert my attention! What better way, therefore, to procrastinate completing my momentous pile of work than to play with new food items.  I snagged some baby back ribs on "sale" at Whole Foods this morning and decided to create a BBQ masterpiece with some store-bought Sweet Baby Ray's BBQ sauce and a spice rub made only with items I have on hand.  This latter component is not that impressive considering most of the spice aisle resides in my cabinets, but it was still fun to play with my various viles of spicy goodness.

Here we go...

Ingredients
4 Tbsp dark brown sugar
1 1/2 Tbsp kosher salt
3/4 Tbsp chili powder
1/2 tsp garlic powder
1/2 tsp minced onion
1/2 tsp cayenne pepper
1/4 tsp fresh cracked black pepper
1 Tbsp canola oil
1 slab (approx 2 lbs) baby back ribs

Preheat your oven to 250 degrees F. Combine the first seven ingredients in a bowl.  Mix well with a fork, break up any lumps in the brown sugar.  Cut your slab of ribs in half.  Place each 1/2 slab on a large piece of aluminum foil, shiny side down.  Brush both sides of each half slab with canola oil.  Coat the meat on both sides with the spice rub, patting it into the meat.


Close the aluminum foil around the ribs like a pouch. Place on a baking sheet and place in the preheated over for about 2 hours. Twenty minutes before the ribs are ready to come out, preheat your grill to hot.  After two hours, remove the ribs from the oven and carefully unfold the aluminum foil to expose the ribs.  Be careful, there will be built up steam so make sure to use oven mitts.  The ribs should look something like this...


Your grill should be preheated by now.  Brush as much BBQ sauce as you like onto the ribs. We like a lot so I go for it in big globs.  Place on the grill, concave side down until the ribs begin to develop nice grill lines and some charring.  Continue to baste with BBQ sauce.  Flip the ribs to the convex side and continue grilling.  Once both sides are nicely charred, it's time to eat!


16 July 2011

Cava Sangria

This weekend B and I spent Saturday night hanging out with great friends celebrating my "work wife", A's, birthday.  We were treated to some great BBQ by her live-in Texan, J, and B and I came armed with Cava Sangria.  Word to the wise, this exceptionally refreshing summer drink goes down very easily - maybe a little too easily - pour carefully.

This recipe is based on a popular Southern Living recipe, but I've tweaked it based on what I like and can easily get my hands on.  And if you're looking for a cheap source for Cava, look no further than Trader Joe's.

Ingredients 

8 large mint leaves
1/2 cup raspberries, washed
1/2 cup sliced fresh strawberries
1 white nectarine, washed, cored and cut into bit size pieces 
1 bottle Cava sparkling wine, chilled 
3/4 cup white grape juice, chilled 
1/4 cup Cointreau orange liqueur 

Press mint leaves against sides of a large pitcher with back of a wooden spoon to release flavors. Add the raspberries, strawberries and nectarine.  Stir in sparkling wine, grape juice and Cointreau. Serve immediately over ice.

 
A shot from our evening of celebrating A. M and I had a great time playing with cocktail umbrellas.  I love that at nearly 30 we can still goof off like children!  At least A and G consented to be in the photo with our ridiculous umbrellas!

06 July 2011

Homemade Cinnamon Rolls Reprised

I feel like I've been doing a lot of Redux/Reprisal posts lately, something I generally prefer to do only sparingly, but this one is issued based on popular demand.

Since we've seriously overdone cake to celebrate work birthdays lately, I opted to make cinnamon rolls to help ring in several coworkers birthdays.  I've made and blogged these before, but I've never done the "step by step" blog which I'm told will be useful for those not used to working with yeast and dough.

This recipe is courtesy of what seems like a thousand year old cookbook. It was my grandmother's.  The cover fell off when I was five.  Pages are stuck together from all the exposure to ingredients in the kitchen. I'm surprised you can still see some of the recipes.  This cookbook and her china are the two things I inherited from my grandmother.  This is just back story to a delicious sweet roll, but on some level I believe the fact that the recipe comes from this cookbook makes the rolls that much more delicious. As hokey as it sounds, they are truly made with love.

Some people's family heirlooms are priceless jewels, mine is a cookbook.
This actually explains a lot about who I am. 

Now, down to the business of making cinnamon rolls.

To make the dough:

Ingredients
1 package active dry yeast
1/2 cup warm water (105 to 115 degrees F)
1/2 cup scalded milk, cooled to lukewarm
1/3 cup sugar
1/3 cup shortening or butter, softened
1 teaspoon salt
1 egg
3 1/2 to 4 cups all purpose flour

Begin by taking your shortening or butter out of the refrigerator and leaving it to soften on the counter.  Then place a generous 1/2 cup of milk in a small sauce pan over medium heat. The recipe doesn't specify a type, I generally use 1% with no problem. The goal here is to scald the milk. To do this, allow the milk to heat very slowly until it comes almost to a boil, where it has many small bubbles all over the top of the milk.  Do NOT allow it to come to a full, rolling boil or else you will scorch the bottom of the pan.  Keep a close eye on the milk as it's very easy to go from scalded to scorched if left unattended.

 This milk has been scalded and is ready to be removed from the heat.

Once your milk has reached scalding, take it off the heat, pour it into a coffee mug and set it aside to cool to lukewarm.  This is something else to watch closely.  It will take some time for the milk to begin to cool appreciably.  But once it does, it will go from warm to lukewarm to cool quickly.  You need to use it in its lukewarm state.

In the last few minutes of your milk cooling, dissolve the package of active dry yeast in the 1/2 cup of warm water in a large mixing bowl. Whisk to ensure all the granules dissolve.

 Dissolve yeast and warm water after whisking

Stir in the lukewarm milk and egg. Whisk to combine.

Don't let the two eggs confuse you, I made a double batch when taking these photos

 Add in the sugar, salt, shortening or butter and enough flour for the dough to begin to pull away from the sides of the bowl when you mix it (anywhere from 1 to 2 cups). At this point, trade in your whisk for a wooden spoon to combine all the ingredients.  Add the flour slowly since you don't want to add anymore than you need.  Too much flour makes any bread dough heavy and, combined with overhandling, tough.

Even though it was left out to soften, don't be surprised if your butter or shortening doesn't fully incorporate.  That's actually okay since any pockets of cool butter will create steam in the baking process leading to lighter, fluffier sweet rolls.

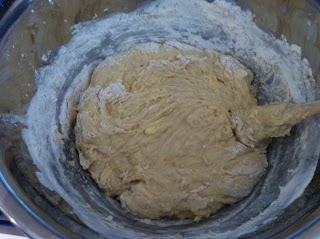
Now comes the tricky part, knowing how much more flour to add.  While the recipe calls for 3 1/2 to 4 cups in total, how much flour you need really is a matter of paying attention to how your dough responds.  I like to slowly add about a 1/2 cup at a time until the dough starts to really pull away from the side of the bowl and come together.  On average this happens after the first 1/2 cup to 1 cup. It looks like this.

Note that it's still not smooth, but it's no longer extremely 
sticky and is starting to form a ball in the middle of the bowl.

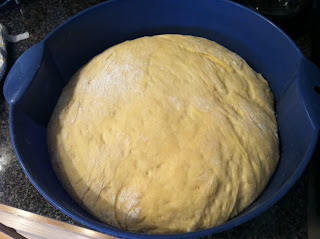
At this point it's ready to knead.  Cover a clean, flat surface with more flour. Turn your dough out on that surface. Sprinkle the top of the dough with more flour to keep it from sticking to your hands.  Also dip your hands in flour, believe me, this will help.  Knead the dough, add more flour as necessary, until it comes together and can easily be shaped into a rounded ball.  This doesn't take long.  Try not to over handle the dough as this will make it tough.  Once your dough looks like this...


...you're ready to place it in a greased bowl to begin rising.  Place the dough in a warm spot in your kitchen (not too close to the stove though) with a towel over the bowl and allow to rise until it has doubled in size, usually about 1 1/2 hours. You'll know it's done when you can poke it and your finger impression remains behind.


Now that the dough has risen, you're ready to make the actual cinnamon rolls.  Just before you're ready to roll out the dough, zap about 3 tablespoons of butter in the microwave for 30 seconds to melt it.  In another bowl, combine 1/3 cup of sugar and two tablespoons of cinnamon.  Return your dough to the clean, flat, floured surface.  Punch the dough down.  Roll the dough out with a rolling pin coated in flour.  Do the best you can to roll the dough into a rectangle, about 15" x 9".  Brush the melted butter all over your rolled out dough, including the edges.  Sprinkle very liberally with the cinnamon/sugar mixture, again, all the ways to the edges.  If you like raisins* or nuts** in your cinnamon rolls, sprinkle those items liberally across the dough as well.

Roll the dough up into a tight log, pinching the edges of the roll to seal it up tightly. Cut into 1 1/2 inch slices and place upright in a greased 9x9x2 pan.  Set aside in a warm spot and allow to rise again until double, usually about an hour. Heat the oven to 375 degrees F. Bake until golden brown, about 25 to 30 minutes.

When the rolls are removed from the oven, allow them to cool for 30 minutes and then glaze them (they'll still be warm, just not hot).  To make the glaze, combine 1 cup powdered sugar with 1 to 2 tablespoons of milk and a 1/2 teaspoon vanilla until smooth.  Brush liberally over the warm cinnamon rolls.


*For raisins, I recommend reconstituting them by soaking a cup or so in two cups of boiling water (from your tea pot is fine) for a few hours before using them.
**Chopped pecans or walnuts are the best in cinnamon rolls as they hold up well to the baking process and I'm told are very complimentary flavors (credit to B here since I don't eat nuts).

05 July 2011

Maple Mustard Chicken Thighs

This recipe is courtesy of Cooking Light and get's a huge Gold Star! It's exceptionally flavorful, super healthy and portion-wise, it doesn't leave the plate feeling empty (or my belly).  And for you WW folks, it's a 7 points plus value dinner. 

As a tip, the recipe calls for marinating the chicken for 2 hours. The last time I made this I left the chicken overnight.  This added a LOT more flavor.

Ingredients

1/3 cup spicy brown mustard
2 tablespoons brown sugar
3 tablespoons maple syrup
2 tablespoons yellow mustard
1 tablespoon grated onion
1 tablespoon cider vinegar
2 teaspoons lower-sodium soy sauce
1/2 teaspoon black pepper
1 garlic clove, minced
8 bone-in chicken thighs, skinned
1/4 teaspoon kosher salt

Combine the first 9 ingredients. (TIP: If you have a food processor you can skip grating the onion or mincing the garlic and just throw about a 1/4 of a medium onion and the clove of garlic into the food processor, along with the remaining 7 ingredients.) Place half of mixture in a zip-top plastic bag; reserve the remaining mixture. Add chicken to bag; seal. Chill 2 hours or more, up to overnight.


    Preheat the grill to medium-high. Remove chicken from bag. Sprinkle chicken with salt. Place chicken on a grill rack coated with cooking spray; grill 8 minutes on each side or until done. Baste the chicken with remaining mustard mixture as you grill it, this will help to further concentrate the flavor.

    I like to serve this dish with a quick rice pilaf (recipe follows).


    For the rice:

    1/2 red pepper, diced
    1/2 green pepper, diced
    1/2 medium yellow onion, diced
    1 cup white rice
    2 cups chicken stock
    1 tsp olive oil

    Combine all ingredients in a sauce pan. Bring to boil.  Reduce heat to low and simmer without removing the lid for 20 minutes.