24 July 2011

Dry-rubbed ribs or how to turn procrastination into something delicious

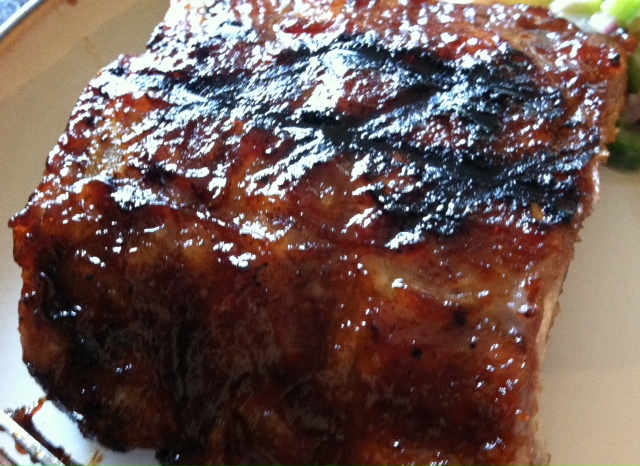
This weekend I brought home a four-inch stack of work. And because that's just how exciting my life is, working my way through the stack has eaten up my entire weekend.  I am still an inch and half and several emails from finished and it all has to be done before I go to work tomorrow, but I can't take it anymore. I have to divert my attention! What better way, therefore, to procrastinate completing my momentous pile of work than to play with new food items.  I snagged some baby back ribs on "sale" at Whole Foods this morning and decided to create a BBQ masterpiece with some store-bought Sweet Baby Ray's BBQ sauce and a spice rub made only with items I have on hand.  This latter component is not that impressive considering most of the spice aisle resides in my cabinets, but it was still fun to play with my various viles of spicy goodness.

Here we go...

Ingredients
4 Tbsp dark brown sugar
1 1/2 Tbsp kosher salt
3/4 Tbsp chili powder
1/2 tsp garlic powder
1/2 tsp minced onion
1/2 tsp cayenne pepper
1/4 tsp fresh cracked black pepper
1 Tbsp canola oil
1 slab (approx 2 lbs) baby back ribs

Preheat your oven to 250 degrees F. Combine the first seven ingredients in a bowl.  Mix well with a fork, break up any lumps in the brown sugar.  Cut your slab of ribs in half.  Place each 1/2 slab on a large piece of aluminum foil, shiny side down.  Brush both sides of each half slab with canola oil.  Coat the meat on both sides with the spice rub, patting it into the meat.


Close the aluminum foil around the ribs like a pouch. Place on a baking sheet and place in the preheated over for about 2 hours. Twenty minutes before the ribs are ready to come out, preheat your grill to hot.  After two hours, remove the ribs from the oven and carefully unfold the aluminum foil to expose the ribs.  Be careful, there will be built up steam so make sure to use oven mitts.  The ribs should look something like this...


Your grill should be preheated by now.  Brush as much BBQ sauce as you like onto the ribs. We like a lot so I go for it in big globs.  Place on the grill, concave side down until the ribs begin to develop nice grill lines and some charring.  Continue to baste with BBQ sauce.  Flip the ribs to the convex side and continue grilling.  Once both sides are nicely charred, it's time to eat!


16 July 2011

Cava Sangria

This weekend B and I spent Saturday night hanging out with great friends celebrating my "work wife", A's, birthday.  We were treated to some great BBQ by her live-in Texan, J, and B and I came armed with Cava Sangria.  Word to the wise, this exceptionally refreshing summer drink goes down very easily - maybe a little too easily - pour carefully.

This recipe is based on a popular Southern Living recipe, but I've tweaked it based on what I like and can easily get my hands on.  And if you're looking for a cheap source for Cava, look no further than Trader Joe's.

Ingredients 

8 large mint leaves
1/2 cup raspberries, washed
1/2 cup sliced fresh strawberries
1 white nectarine, washed, cored and cut into bit size pieces 
1 bottle Cava sparkling wine, chilled 
3/4 cup white grape juice, chilled 
1/4 cup Cointreau orange liqueur 

Press mint leaves against sides of a large pitcher with back of a wooden spoon to release flavors. Add the raspberries, strawberries and nectarine.  Stir in sparkling wine, grape juice and Cointreau. Serve immediately over ice.

 
A shot from our evening of celebrating A. M and I had a great time playing with cocktail umbrellas.  I love that at nearly 30 we can still goof off like children!  At least A and G consented to be in the photo with our ridiculous umbrellas!

06 July 2011

Homemade Cinnamon Rolls Reprised

I feel like I've been doing a lot of Redux/Reprisal posts lately, something I generally prefer to do only sparingly, but this one is issued based on popular demand.

Since we've seriously overdone cake to celebrate work birthdays lately, I opted to make cinnamon rolls to help ring in several coworkers birthdays.  I've made and blogged these before, but I've never done the "step by step" blog which I'm told will be useful for those not used to working with yeast and dough.

This recipe is courtesy of what seems like a thousand year old cookbook. It was my grandmother's.  The cover fell off when I was five.  Pages are stuck together from all the exposure to ingredients in the kitchen. I'm surprised you can still see some of the recipes.  This cookbook and her china are the two things I inherited from my grandmother.  This is just back story to a delicious sweet roll, but on some level I believe the fact that the recipe comes from this cookbook makes the rolls that much more delicious. As hokey as it sounds, they are truly made with love.

Some people's family heirlooms are priceless jewels, mine is a cookbook.
This actually explains a lot about who I am. 

Now, down to the business of making cinnamon rolls.

To make the dough:

Ingredients
1 package active dry yeast
1/2 cup warm water (105 to 115 degrees F)
1/2 cup scalded milk, cooled to lukewarm
1/3 cup sugar
1/3 cup shortening or butter, softened
1 teaspoon salt
1 egg
3 1/2 to 4 cups all purpose flour

Begin by taking your shortening or butter out of the refrigerator and leaving it to soften on the counter.  Then place a generous 1/2 cup of milk in a small sauce pan over medium heat. The recipe doesn't specify a type, I generally use 1% with no problem. The goal here is to scald the milk. To do this, allow the milk to heat very slowly until it comes almost to a boil, where it has many small bubbles all over the top of the milk.  Do NOT allow it to come to a full, rolling boil or else you will scorch the bottom of the pan.  Keep a close eye on the milk as it's very easy to go from scalded to scorched if left unattended.

 This milk has been scalded and is ready to be removed from the heat.

Once your milk has reached scalding, take it off the heat, pour it into a coffee mug and set it aside to cool to lukewarm.  This is something else to watch closely.  It will take some time for the milk to begin to cool appreciably.  But once it does, it will go from warm to lukewarm to cool quickly.  You need to use it in its lukewarm state.

In the last few minutes of your milk cooling, dissolve the package of active dry yeast in the 1/2 cup of warm water in a large mixing bowl. Whisk to ensure all the granules dissolve.

 Dissolve yeast and warm water after whisking

Stir in the lukewarm milk and egg. Whisk to combine.

Don't let the two eggs confuse you, I made a double batch when taking these photos

 Add in the sugar, salt, shortening or butter and enough flour for the dough to begin to pull away from the sides of the bowl when you mix it (anywhere from 1 to 2 cups). At this point, trade in your whisk for a wooden spoon to combine all the ingredients.  Add the flour slowly since you don't want to add anymore than you need.  Too much flour makes any bread dough heavy and, combined with overhandling, tough.

Even though it was left out to soften, don't be surprised if your butter or shortening doesn't fully incorporate.  That's actually okay since any pockets of cool butter will create steam in the baking process leading to lighter, fluffier sweet rolls.

Now comes the tricky part, knowing how much more flour to add.  While the recipe calls for 3 1/2 to 4 cups in total, how much flour you need really is a matter of paying attention to how your dough responds.  I like to slowly add about a 1/2 cup at a time until the dough starts to really pull away from the side of the bowl and come together.  On average this happens after the first 1/2 cup to 1 cup. It looks like this.

Note that it's still not smooth, but it's no longer extremely 
sticky and is starting to form a ball in the middle of the bowl.

At this point it's ready to knead.  Cover a clean, flat surface with more flour. Turn your dough out on that surface. Sprinkle the top of the dough with more flour to keep it from sticking to your hands.  Also dip your hands in flour, believe me, this will help.  Knead the dough, add more flour as necessary, until it comes together and can easily be shaped into a rounded ball.  This doesn't take long.  Try not to over handle the dough as this will make it tough.  Once your dough looks like this...


...you're ready to place it in a greased bowl to begin rising.  Place the dough in a warm spot in your kitchen (not too close to the stove though) with a towel over the bowl and allow to rise until it has doubled in size, usually about 1 1/2 hours. You'll know it's done when you can poke it and your finger impression remains behind.


Now that the dough has risen, you're ready to make the actual cinnamon rolls.  Just before you're ready to roll out the dough, zap about 3 tablespoons of butter in the microwave for 30 seconds to melt it.  In another bowl, combine 1/3 cup of sugar and two tablespoons of cinnamon.  Return your dough to the clean, flat, floured surface.  Punch the dough down.  Roll the dough out with a rolling pin coated in flour.  Do the best you can to roll the dough into a rectangle, about 15" x 9".  Brush the melted butter all over your rolled out dough, including the edges.  Sprinkle very liberally with the cinnamon/sugar mixture, again, all the ways to the edges.  If you like raisins* or nuts** in your cinnamon rolls, sprinkle those items liberally across the dough as well.

Roll the dough up into a tight log, pinching the edges of the roll to seal it up tightly. Cut into 1 1/2 inch slices and place upright in a greased 9x9x2 pan.  Set aside in a warm spot and allow to rise again until double, usually about an hour. Heat the oven to 375 degrees F. Bake until golden brown, about 25 to 30 minutes.

When the rolls are removed from the oven, allow them to cool for 30 minutes and then glaze them (they'll still be warm, just not hot).  To make the glaze, combine 1 cup powdered sugar with 1 to 2 tablespoons of milk and a 1/2 teaspoon vanilla until smooth.  Brush liberally over the warm cinnamon rolls.


*For raisins, I recommend reconstituting them by soaking a cup or so in two cups of boiling water (from your tea pot is fine) for a few hours before using them.
**Chopped pecans or walnuts are the best in cinnamon rolls as they hold up well to the baking process and I'm told are very complimentary flavors (credit to B here since I don't eat nuts).

05 July 2011

Maple Mustard Chicken Thighs

This recipe is courtesy of Cooking Light and get's a huge Gold Star! It's exceptionally flavorful, super healthy and portion-wise, it doesn't leave the plate feeling empty (or my belly).  And for you WW folks, it's a 7 points plus value dinner. 

As a tip, the recipe calls for marinating the chicken for 2 hours. The last time I made this I left the chicken overnight.  This added a LOT more flavor.

Ingredients

1/3 cup spicy brown mustard
2 tablespoons brown sugar
3 tablespoons maple syrup
2 tablespoons yellow mustard
1 tablespoon grated onion
1 tablespoon cider vinegar
2 teaspoons lower-sodium soy sauce
1/2 teaspoon black pepper
1 garlic clove, minced
8 bone-in chicken thighs, skinned
1/4 teaspoon kosher salt

Combine the first 9 ingredients. (TIP: If you have a food processor you can skip grating the onion or mincing the garlic and just throw about a 1/4 of a medium onion and the clove of garlic into the food processor, along with the remaining 7 ingredients.) Place half of mixture in a zip-top plastic bag; reserve the remaining mixture. Add chicken to bag; seal. Chill 2 hours or more, up to overnight.


    Preheat the grill to medium-high. Remove chicken from bag. Sprinkle chicken with salt. Place chicken on a grill rack coated with cooking spray; grill 8 minutes on each side or until done. Baste the chicken with remaining mustard mixture as you grill it, this will help to further concentrate the flavor.

    I like to serve this dish with a quick rice pilaf (recipe follows).


    For the rice:

    1/2 red pepper, diced
    1/2 green pepper, diced
    1/2 medium yellow onion, diced
    1 cup white rice
    2 cups chicken stock
    1 tsp olive oil

    Combine all ingredients in a sauce pan. Bring to boil.  Reduce heat to low and simmer without removing the lid for 20 minutes.

    25 June 2011

    French farmers fantasy

    We are supremely lucky to have a fantastic farmer's market in Falls Church, just a few miles up the road from our house.  I love building a trip there into my Saturday morning to grab locally grown veggies, artisanal cheeses, sausage, even occassionally some locally made puppy treats for my favorite canines, Jager and Zoya.  I've loved it since we moved to this part of town last year and I discovered it.  But I love it more now - because it makes me think of good travel memories and eating our way across France - with the advent of a brand new Creperie booth.  B, the crepe critic in our house, tagged along with me this weekend to check out these delicious anytime treats.

    Watching the crepes being made

    B's crepe, filled with bananas, nutella and coconut (it was great for my waistline that he chose nutella and coconut, which I can't eat. He says it was delicious!!)

    While B was waiting for his crepe to be made, I was checking out all the gorgeous produce at the stands around us.  While pricier than the grocery store, there is something to buying produce from the same person who grew and picked it that makes it taste better.  And the colors in mid-summer when everything is ripe lend themselves so well to photos that I couldn't resist taking some to share.

    VA grown zucchini and yellow squash

    Eggplants everywhere!

    Since the line at the Creperie was long, I had plenty of time to browse the rest of the market.  I was thrilled to find that not only were our French travels represented, but also many summers in Greece.  The very last booth, a nursery, showcased not one, but two of the native Greek items I've long associated with summer - olives and figs. 


    I've yet to figure out where I'm going to plant a fig tree, but before the summer is over, it will be mine.  Join us next summer for figs and brie, wine poached figs and vanilla bean ice cream, you name the fig dish and we'll be serving it!

    20 June 2011

    Beef and Mushroom Sloppy Joes

    This is a super easy, filling and good for your recipe courtesy of Cooking Light.  A caveat though - the magazine claims this makes four sandwiches.  Maybe I make wimpy sandwiches, but B and I can get six to eight good size sandwiches out of each batch of this quick, healthy recipe.

    Ingredients

    1 tablespoon olive oil
    12 ounces ground sirloin
    2 (8-ounce) packages presliced cremini mushrooms
    1 cup chopped onion
    3 garlic cloves, minced
    1/2 cup tomato paste
    1 tablespoon minced fresh oregano
    2 tablespoons red wine vinegar
    2 tablespoons Worcestershire sauce
    1 tablespoon molasses
    1/4 teaspoon salt
    3/4 teaspoon fresh cracked pepper
    Hot sauce to taste
    4 hamburger buns, toasted in the oven
      Heat a large nonstick skillet over medium-high heat. Add oil; swirl to coat. Add beef; cook for 4 minutes or until browned, stirring to crumble. While beef cooks, place mushrooms in a food processor; pulse 10 times or until finely chopped. Add mushrooms, onion, and garlic to pan; cook for 3 minutes or until onion is tender. Add tomato paste and next 5 ingredients (through salt) to pan; cook 5 minutes or until mushrooms are tender and liquid evaporates. Stir in pepper and hot sauce. Spoon about the  beef mixture on bottom half of each bun; top with top halves of buns.

      18 June 2011

      Happy 60th, Mom!

      While my prior week in Michigan had been fun, I hadn't originally planned for it to be so long since B and I had already booked tickets to come back the weekend of June 17th to help my dad pull off a surprise party for my mom's 60th birthday.

      The plan was simple.  My dad was to take my mom to Stratford, Ontario for the Shakespeare Festival, one of her favorite things to get her away from the house and B, my brother T and I were to swoop in and make a party happen.  And that's exactly how it went - with a LOT of help from family and friends.

      Our arriving flight was delayed on Friday so that we didn't hit the ground in the Detroit until nearly 8PM.  Too late to go to Costco or do any of the other shopping necessary until the next day.  Therefore, we spent Friday night getting everything set up around the house and making sure anything that could be cleaned or prepped was done. 

      Saturday dawned early as B and I hit what felt like every grocery store, florist and variety store imaginable.  And then we cooked. Our day was spent marinating 25 lbs of lamb, prepping salads and cooking appetizers for 50 people.  B and T took care of all the pick-ups (cupcakes, etc.) and our family friends K and P joined us to break down vegetables and grill off peppers and lamb souvlakia by the dozen.  With 30 minutes to go before everyone was due to arrive I was worried we were a little behind.  Enter the aunts.  My two aunts from Windsor showed up early, anticipating that we might need help.  Add to them two cousins and a family friend and by 6PM everything I was worried about had been completed in a firestorm of aunt directed activity.   I can throw a party with the best of them and while I'm certain we'd have been fine without their help, I am so glad they were there. These women are in their 70s but they make it look effortless.

      Every last bit of work was worth it to see the look on my Mom's face when she walked through the door to see 50 of her closest friends and family standing in her kitchen while my brother and his two super helpful friends (one had been there helping most of the day) set of confetti cannons.  She actually had to hold on to the door to steady her shock as my dad leaned in to say, "Gotcha!"

      It was a great party. Everyone chatted and enjoyed each others company, the pounds and pounds of food, cupcakes, and homemade Greek sweets courtesy of my aunts. Although I was too busy running around to get pictures, I did get just one of my Aunt V and B cleaning up the aftermath of the confetti cannons.  The paper quantity was so great they decide a snow shovel would be more effective than a dust pan - hilarious!


      Happy 60th Birthday, Mom!!